Hello everyone! I’m super-excited to be in New Mexico. The printshop is cold, the ink is stiff, but I’m powering through and hopefully will be able to complete 3-4 prints during the time that I’m here.
So reduction printing is a relief technique that can be done with either wood or linoleum blocks. The idea is to create a multi-color image using only one block by cutting away more of the block in-between each color printing. It can be hard to conceptualize at first, but I’ll go through it step by step this week.
Currently I’m working on a series of portraits of different varieties of chickens. The one I’ll be using as an example today is a Black-tailed Japanese Bantam. My first step was to look up images of the chicken online, and draw an outline on the wood block. Sometimes I draw, sometimes I use transfer paper to trace an image. Either way, once I have the design I want, I go over it in Sharpie marker so it won’t be washed away when I clean the ink off the block later.
After the image is on the block, the first step is to think about what part(s) of the image you want to keep the color of the paper. You don’t have to do this step, you could just print a solid block of color, but I want to leave some white in this image so my first step will be cutting away anything I want to keep white.

Wood block with first cutting stage done
You can see here that I’ve cut away a bit of the chicken’s body and some of the edges of the tail feathers.
My first color is going to be yellow. In this case, I used Graphic Chemical’s Golden Yellow straight out of the can. I almost always mix my own colors, but I really like this yellow so didn’t mix in anything else.
Here is a photo of the ink rolled out on the glass slab.
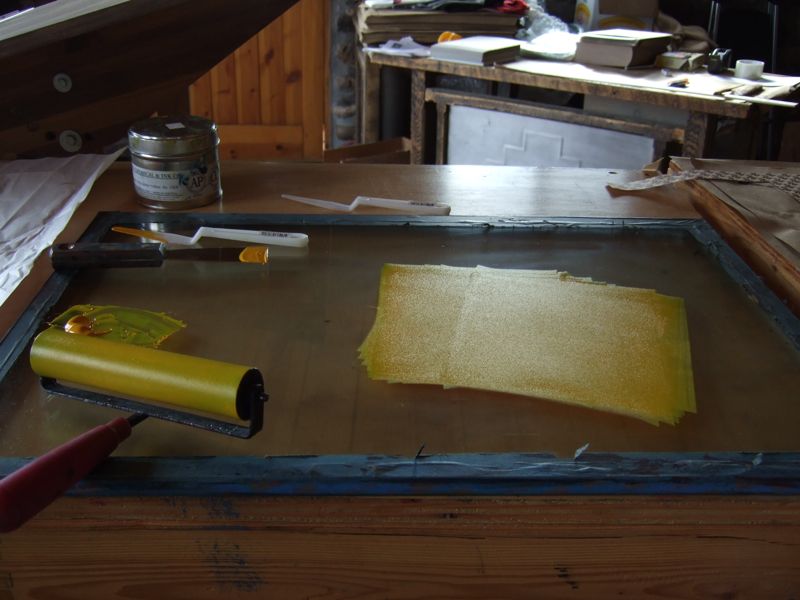
Ink slab
I roll out the ink with the brayer, and roll a smooth, even coat onto the surface of the wood block. The ink does not go down into the cut lines, so those portions I’ve cut away will remain the color of the paper throughout the entire printing cycle. Once a part of the block is cut, nothing will ever print over that spot.

Wood block with first color rolled on
I already had paper torn and ready. For this print I’m using Thai Mulberry paper that is kind of an off-white, natural color. So my paper is ready, my block is inked up, and I’m ready to print!
Well, almost. First I had to shake out all the spiders that were inside the rolled-up press blankets. I guess this is one of the dangers of a rural printshop!

spiders!
There were many more that scurried away as I was grabbing my camera
Anyway, I got the press set up and ready to go. The first step of printing is very easy, just center the block onto the paper, inked-side down, then flip it over so the paper is on top of the block, cover with newsprint and the blankets, and run through the press.
Here is the completed stage 1 of the print. You can see that all the parts where I cut away the block remained the color of the paper, and all the rest is yellow. Tonight I will think about two things: what parts of the image do I want to keep yellow, and what will be my next color. Tune in tomorrow!

Print with first color done
